How do I set up Microsoft SSO integration for automatic digital business card creation for my team?
To set up Microsoft SSO integration for automatic digital business card creation for your team, log in to your QRCodeChimp account, go to the Dashboard, click Integrations from the left panel, select SSO, and then choose Microsoft SSO.
Then, follow these steps:
Step 1: Click Connect
Click Connect to initiate the Microsoft SSO setup.

Step 2: Choose the SSO Login URL branding type
Select either QRCodeChimp Branding or Custom Branding based on your preference. If you choose Custom Branding, complete the required custom branding or white label setup first. Once you have selected the preferred branding option, click Save & Continue.

Note: If you choose Custom Branding, you need to enable white labeling first. You can then follow the steps in this FAQ to register an app in Microsoft Entra ID for custom branding:
How to Register an App in Microsoft Entra ID for QRCodeChimp
Step 3: Enter the Account ID
Enter a unique Account ID for your organization. If an Account ID already exists, it will appear prefilled and cannot be edited. Once the Account ID is filled, click Next.

Step 4: Configure SSO access and notifications
Choose which users can get digital business cards through the SSO Login URL and set the related email notifications and alerts.
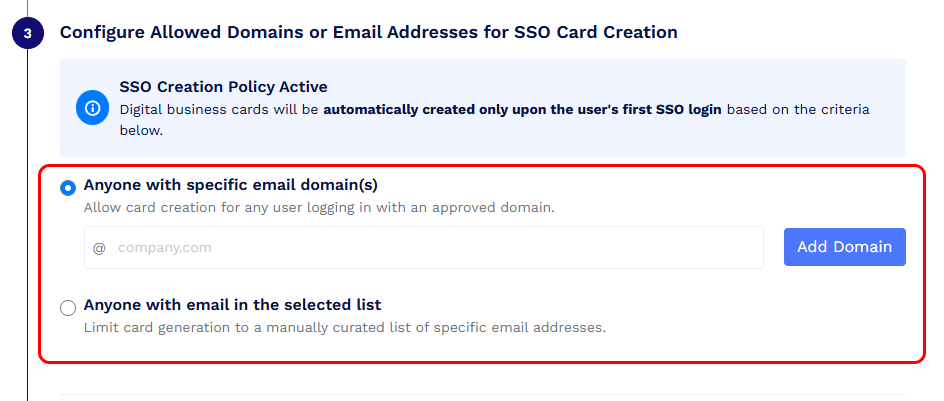
4.1 Choose who can get cards through SSO
Choose who should be eligible for automatic digital business card creation when they log in using the SSO Login URL. You can select:
- Anyone with specific email domain(s): Enter the allowed domains for digital business cards creation, such as
@company.com -
Anyone with email in the selected list: Add specific email addresses manually or upload a CSV containing allowed email addresses.

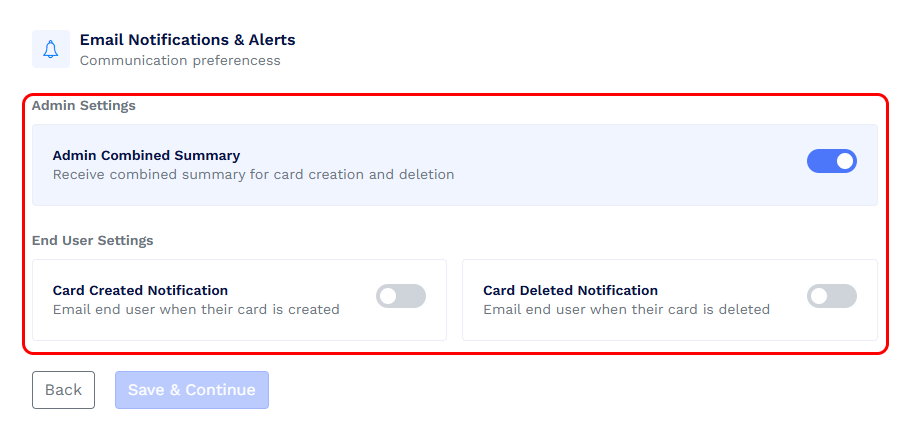
4.2 Configure email notifications and alerts
Choose which users can get digital business cards through the SSO Login URL and set the related email notifications and alerts.
Set the notifications you want, such as:
- admin combined summary
- end user card created notification
-
end user card deleted notification

After completing this step, an automated email will be sent to the support team to verify the domains you entered.
Then click Save & Continue. If any of your domains require verification, you will see the pop-up below. Click Notify Support Team to proceed to the next step.

Step 5: Design and save the digital business card template and QR code
Click Design Now to create the digital business card template that will be used for users who log in through SSO, then save the design. Fields mapped through the SSO setup remain locked, so users will not be able to edit those mapped fields manually.

Step 6: Wait for domain verification
Your entered domains must be verified before digital business cards can be created through SSO. Once the domain verification is completed, you will be notified by email.
Step 7: Share the SSO Login URL with your team
After your domain is verified, share the SSO Login URL with your team members.
When users from the verified domains or selected email addresses log in through this SSO Login URL, their digital business cards will be created automatically based on your setup.
Important:
Do not share the SSO Login URL with your users until your domain verification is completed.